Category Archives: customized
Engagement Inspiration – Thank You Cards
Congratulations – you’re engaged!! Here are some wonderful cards to thank your guests after your engagement party or bridal shower.
All are handmade and customizable from shops on Etsy. Two of them are pdf files so you can print out however many you need for yourself. Clicking on each photo will open a new tab to that shop’s listing for information about each item.


![]()

Happy Wedding Wishes,
Marcie Forest
www.forestcandlestudio.etsy.com
www.facebook.com/ForestCandleStudio
www.pinterest.com/forestcandle
Offbeat Wedding Gowns
Gorgeous, fun, unusual…does this describe what you want to wear on your wedding day?
Perhaps one of these unique, custom-made wedding gowns will be perfect for you!
.

Carnival inspired wedding dress by Patterns Optional
.

Fairytale inspired cotton wedding dress by Wedding Dress Bridal
.

Steampunk victorian wedding gown by Chrisst
.

Bohemian wedding gown by Kata Kovacs
.

Corset wedding gown by Wedding Dress Fantasy
.

18th century style wedding gown by Miss Lisa 1867
.

Wedding dress with vintage kimono fabric by Shantique
.
Happy Wedding Wishes,
Marcie Forest
www.forestcandlestudio.etsy.com
www.facebook.com/ForestCandleStudio
www.pinterest.com/forestcandle
July Giveaway!
This month’s WedEclectic giveaway is hosted by
Just look at the memorial charms she creates! If you are struggling to find a way to include the memory of someone special in your wedding, this would be the perfect way to do so!
For brides’ and grooms’ floral accessories…


For bridal, anniversary, or everyday jewelry…


And for a keepsake ornament or decor…

Keri is offering a small personalized bridal bouquet charm for this month’s giveaway…a $55 value!


This giveaway will run until midnight, July 31st, but don’t wait!
Entries will be accepted for:
Commenting, including your favorite item from Delaney Photo Jewelry‘s shop.
Commenting that you hearted Delaney Photo Jewelry‘s Etsy shop (and your Etsy name for verification).
Following Delaney Photo Jewelry’s blog.
Commenting that you follow DelaneyPhotoJewelry (@delaneyjewelry) on Twitter (and your twitter name for verification).
Commenting that you friended Delaney Photo Jewelry on Facebook (and your FB page for verification).
Follow @WedEclectic on Twitter.
Friend WedEclectic on Facebook.
Tweeted this giveaway (please copy your tweet here).
Posted this giveaway on your Facebook page (please copy your post here).
Posted this giveaway on your blog (please include the link here).
Posted this giveaway on a wedding/social network (please include the link here).
The giveaway is open worldwide. Shipping is the responsibility of the winner.
The winner will be chosen randomly, verified, and contacted on August 1st via email with the good news!
>DIY wedding favour boxes
>Wedding favours are a nice way to say thank you to your guests but what sort of wedding favours do you give them?
A lot of attention is normally paid to what to put into the boxes but we must not forget that the box itself could be personalised as well. One easy way is make them!
The advantage of making them is that you can make them to the size you want and using the paper you have chosen. Yes it will take time and effort but your guest will appreciate your effort as you shall see.
Step one, this is the template you will need to understand to make these boxes.

A = length of box
B = height of box
C = 2 cm length which is needed in construction.
The dashed lines will be your fold lines.
From a standard A4 sheet of paper the largest box you can make is a 5cm(side) x 5cm(side) x 7cm(height) which is more then enough to fit a good size chocolate (or what small treat you may give them).
Step two, rather then folding the paper straight away, I would recommend scoring the dotted lines because these will become the folds. Why are you scoring the paper rather then folding it straight away? Well, this will give a more accurate fold and give a cleaner finish.
Step three, crease each of the scored lines you made so it looks like this.

Step four, fold as following and then insert the two ends into each other.

Step five, this is the tricky bit, pushing the base down. You will need to follow the folds you have made and gently manoeuvre each side on top of each other. This manipulation will open up the side where you have inserted the ends together. To prevent the ends from coming apart you can use a clip to hold them together.

This will require a bit of patient and practice but it will fold down if you gently push it down gradually.
Finished, you have the base for your box.

To make the lid for the box is very simply! All you need to do is
- Add 1-2mm on A – side of the box
- Decrease B – height of the box to 2-3cm
then you follows the same folding method as above. Here is my lid to the above box.

As mentioned above, you can use almost any paper you like to make these boxes but I would recommend you use paper that is around 80-100 gsm because it will make step 5 a little bit easier.
Now grab a load of your friends and family and fold to your hearts content!
NOTES :
If you require larger pictures then just click on the picture and it will take you to a larger version.
There is another way of folding the lid to make it more decorative. If you want to learn more then let me know in the comments and I’ll sort out a tutorial for those.
>Who Says You Need a Diamond Engagement Ring?
>Perhaps the most enduring tradition of the modern bride today is the ring. In particular the diamond ring and in recent years coloured diamond rings for those with an extensive budget. Remember J lo’s super fabulous fancy pink ring designed by Harry Winston? Yum J But really…who says you need a diamond ring or even a ring at all?


>Get Organized!
>
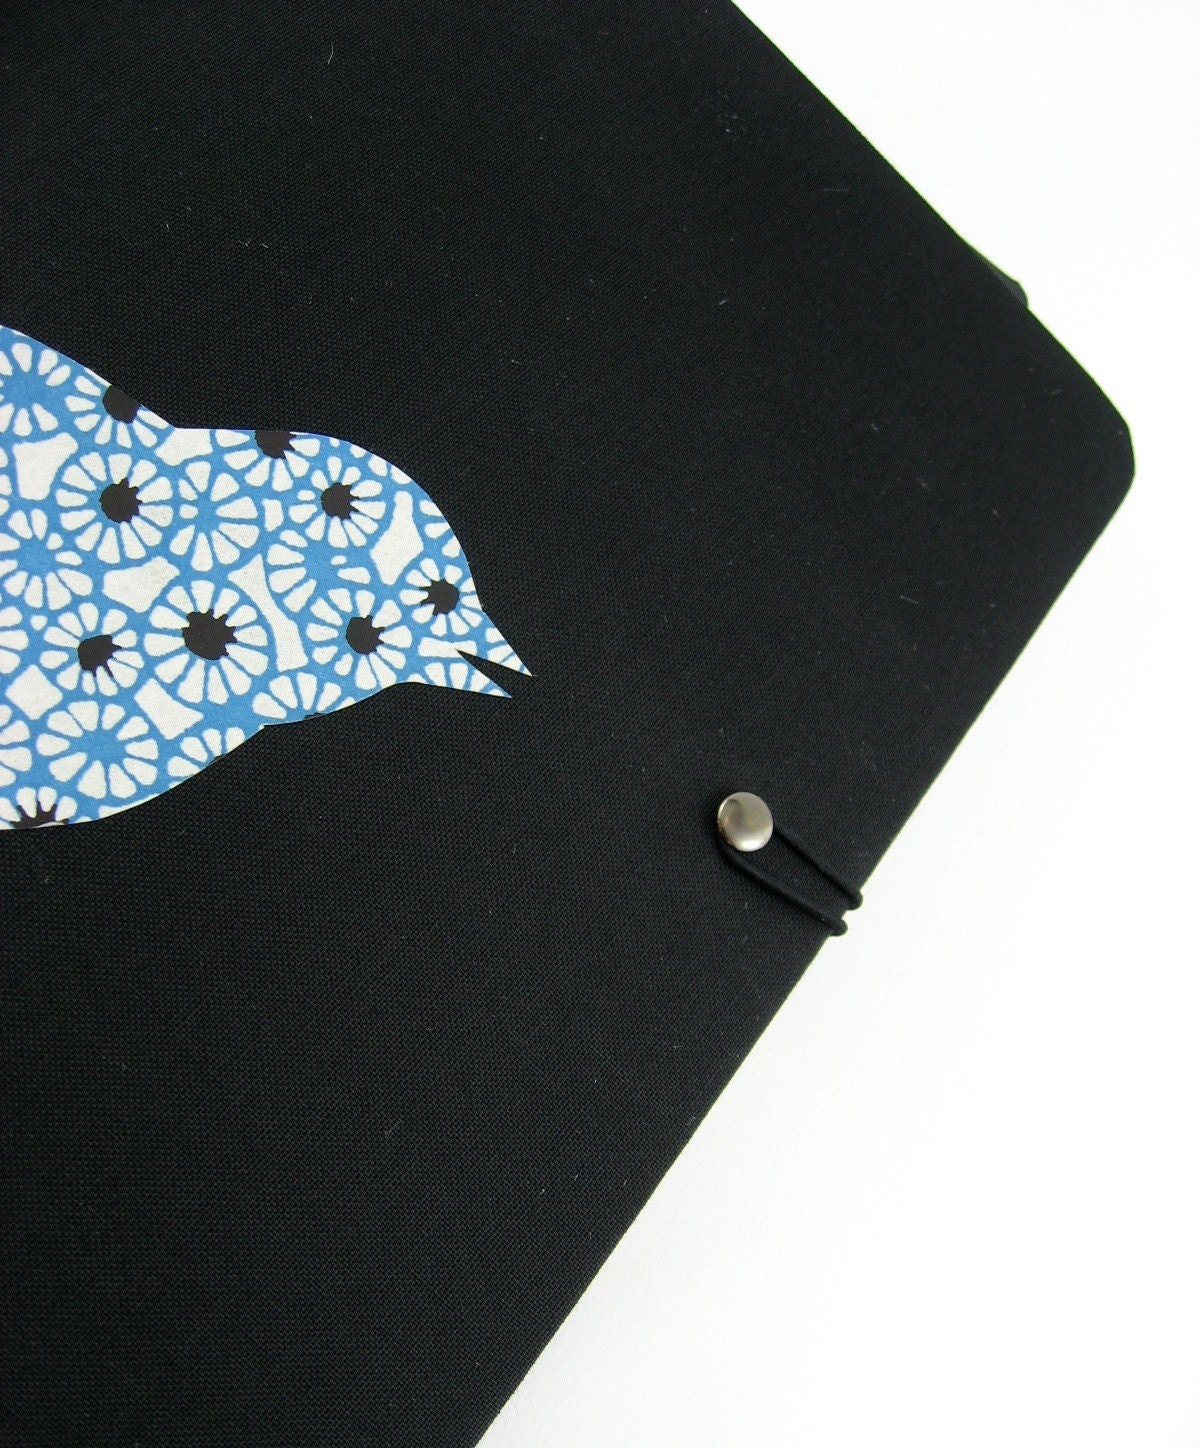 |
| Black Bird DayPlanner by doublehappiness |
It’s the start of a new year, and this offbeat bride’s resolution:
Planning a wedding is an incredibly exciting and sometimes completely overwhelming undertaking. No matter how large or small, formal or informal, offbeat or traditional, your wedding, there will be more than a handful of decisions to make along the way – not mention numbers to keep track of, appointments to keep, and people to coordinate.
If other offbeat (read “creative and inspired”) brides out there are anything like me, they are masters of scheming, and dreaming, and bookmarking, and “to-do”ing, and sketching and scribbling, and “favoriting” all over the place!
So….
Resolution for the new year: get all those names, and numbers, and ideas in one place!
Bonus: With a little help from other creative people, like the shop owners at Etsy.com, organization doesn’t have to be boring. In fact, your wedding planner, should be the first thing you purchase or create for your wedding that radiates the oh-so-in-love personality you hope to capture on the big day.
 |
| PickMePaperDesigns |


 |
||||||
| Oilcloth 3-ring binders by rbtbags on Etsy |